Click to win free Ipad

Sunday, January 3, 2010

How to Jailbreak iPhone 3G/3GS 3.1.2 Using PwnageTool 3.1.4 On Mac

Finally iPhone Dev team released PwnageTool 3.1.4 for Mac OS Users to jailbreak iPhone 2G/3G/3GS 3.1.2 & iPod Touch 1G/2G 3.1.2. Windows users shout download custom firmware for OS 3.1.2 as PwnageTool 3.1.4 for Windows will not be available.
As usual we are here with complete guide on how to jailbreak iPhone 3G/3GS 3.1.2 using PwnageTool 3.1.4 and Unlock with Ultrasn0w. please note if you have already upgraded to Firmware 3.1.2 then you are out of luck for unlock.

How to Jailbreak iPhone 3G/3GS 3.1.2

1. Firmware downloaded in Tools sections save it on your Computer (Preferably create a folder pwnage and save in that folder this is for simplicity)
2. Download PwnageTool 3.1.4 and save it in pwnage folder.
3. Keep your iPhone connected to your computer.
4. Double click PwnageTool 3.1.4 to mount it and create shortcut of PwnageTool in pwnage folder.
5. Now Launch PwnageTool and click ok on warring message “PwnageTool is a free tool”
6. Select Expert Mode from Top left menu.
7. Now select Device i.e iPod Touch, iPhone and click on Blue arrow icon to continue.
Pwnagetool 3.1.3
8. PwnageTool will auto detect your Firmware 3.1.2 IPWS file downloaded in step 1, if not then click browse and select proper file.
9. Select the apps you want to install from given menu, at least cydia installer and click on build to start custom firmware building process.
10. Now select location to save custom IPWS file created by PwnageTool.
11. PwnageTool 3.1.4 may take 10-15 min to complete Custom iPhone 3GS 3.1.2 IPSW file creation.
12. Enter Admin password.
13. PwnageTool 3.1.2 will display a prompt “has your iPhone 3G been pwned before?” If you are unsure, click no.
14. Turnoff your iPhone as per directions keep it connected.
15. Now launch iTunes and restore your iPhone with your custom firmware bundle by holding the “Alt/Option” button and clicking “restore”.
16. Browse and Select the custom IPSW file you created (iPhone2,1_3.1_7D11_Custom_Restore.ipsw) and click “open”.
17. iTunes 9 will restore your iPhone, Process may take 10-15 minutes.
18. Your iPhone 3GS 3.1 will reboot automatically
21. That’s it, if you have followed above steps properly then you will have your iPhone 3GS OS 3.1.2 jailbreaked.

Jailbreak and unlock iPhone 3.1.2 , using redsnow

Jailbreak iPhone 3.1.2
Update #2: Want to unlock iPhone 3.1.2? Go to my download and install blacksn0w post to unlock.
Update #1: Go to my jailbreak iPhone 3.1.2 with blackra1n post to jailbreak your iPhone or iPod Touch!
Today the iPhone 3.1.2 update was released to iPhone, iPhone 3G, iPhone 3GS, and iPod Touch usres. This update includes mainly bug fixes. If you would like to jailbreak or unlock your device, you must read this. If you have an unlocked iPhone 3G or iPhone 3GS do not update to this new firmware, updating to the iPhone 3.1.2 firmware will permanently update your baseband. The newer baseband does not support software unlocking.
The jailbreak has not been released yet, but you if you’ve got too much time on your hands you may be able to jailbreak if you try the following. If this works please share your results in the comments.

How to Jailbreak iPhone 3.1.2Jailbreak and unlock iPhone 3.1

1. Update to iPhone 3.1.2. After updating, find your iPhone 3.1.2 IPSW file or download it using any of the links below. Remember, don’t use Safari to download. Safari can’t download .IPSW files properly, use a different browser!
2. Download redsn0w.
3. Follow the jailbreaking guide at the Jailbreak iPhone 3.1 post.

Unlock iPhone 3.1.2

It’s possible to unlock iPhone 3.1.2 but only if your baseband has not been updated to 05.11.07 or the newer baseband, you must create a custom firmware that uses the 04.26.08 baseband. The iPhone 3.1.2 update updates the baseband to a newer one that permanently blocks the software unlock. A guide on how to unlock iPhone 3.1.2 will be up once a jailbreak tool is released.

Unlock iPhone 3GS 2G Firmware 3.1.2 on Windows, ultra snow

Again so Quickly Dev Team released the new Pwnage tool 3.1.4 to Jailbreak iphone 3GS 3.1.2 on MAC. But again this time it was not available for the Windows. So again we made a iPhone 3GS 3.1.2 Activated Custom Firmware to Jailbreak and Unlock iPhone 3GS 3.1.2. Yes i tried it this on my iPhone 3GS on Windows and it was working so smoothly. But only users with a previously Jailbroken iPhone 3GS should try this tutorial and yes it does not work for those who have an iPhone 3GS with Firmware 3.1 out-of-the-box. So here is the guide:-
If your on baseband 05.11.07 thans read this Unlock iPhone 3.1.2 baseband 05.11.07 with blacksn0w
Download all these 3 Rapidshare Links and Join with them HJsplit and Unzip it on your desktop.

Links for iPhone 2G
iPhone2G-Custom312-Technobuzz.zip.001
iPhone2G-Custom312-Technobuzz.zip.002
iPhone2G-Custom312-Technobuzz.zip.003
Links for iPhone 3GS
iPhone2_1_3.1.2_7D11_Activated_Custom_Restore_Technobuzz_net.ipsw.001
iPhone2_1_3.1.2_7D11_Activated_Custom_Restore_Technobuzz_net.ipsw.002
iPhone2_1_3.1.2_7D11_Activated_Custom_Restore_Technobuzz_net.ipsw.003
After Joining them with HJsplit and savie it on the Desktop do these steps.
1. Download and intsall iTunes 9, and then run it.
.
2. Connect your iPhone 3GS to the Windows PC.
.
3. Click ‘Restore’ while holding SHIFT key and select the Custom IPSW that you saved in your desktop.
.
4. Now sit back and enjoy as iTunes does the rest for you. Once everything is processed and OS boots up, install Ultrasnow, See below how to do that.
.
5. Start “Cydia” on your iPhone and click “Manage” tab on the bottom than “Sourcesas seen in the screenshot below:
cydia-sources
6. Click “Edit” and then on “Add”. Now enter a url source
as seen in
the screenshot below. Type
“http://repo666.ultrasn0w.com” and touch on “Add Source”.
add source
7. Now Cydia will automatically update your sources by following a series of automated steps.
instaal cydia
8. After installation is completed. Search for “ultrasn0w” in Cydia and install it.
1
Thats it! now your
iPhone 3GS
3.1.2  is Jailbreak and Unlock too. Enjoy it

Jailbreak and Unlock iPhone 3.1.2 Firmware on Windows

PwnageTool 3.1.4 has been released and is for Mac OS X users only. The following step-by-step tutorial/guide will help you in running fully unlocked and jailbroken iPhone 2G,3G and 3GS with iPhone firmware 3.1.2 using your Windows PC without having to wait for Windows version of PwnageTool or redsn0w. Mac version of the tutorial can be found here.
If you don’t care about the unlock and just want to jailbreak your iPhone on 3.1.2, then you can also alternatively follow the guide posted here to jailbreak your iPhone on Windows with blackra1n in just 30 seconds.
Jailbreak iPhone 3.1.2 On Windows PC
Step 1: Make sure you have downloaded and installed the latest version of iTunes.
Step 2: Now connect your iPhone with your PC. You must connect it to a single usb port on the backside of your computer. Do not use any usb hub or the ports in the front as this could result in an error during update process.
Step 3: Start iTunes. Sync your iPhone with your PC so that iTunes backs-up all your important data including settings, apps, music, contacts and photos.
Step 4: As a Windows user, you will have to now download a custom firmware for your iPhone which has been cooked on a Mac using PwnageTool 3.1.4. Don’t ask us for the download links for these custom firmware files for the obvious reasons. Just Google it:
  • For iPhone 2G: “iPhone1,1_3.1.2_7D11_Custom_Restore”
  • For iPhone 3G: “iPhone1,2_3.1.2_7D11_Custom_Restore”
  • For iPhone 3GS: “iPhone2,1_3.1.2_7D11_Custom_Restore”
and use one of the torrent links to download the custom created .ipsw file
Step 5: Once you have downloaded the required .ipsw file, Move it into the following location depending on which version of Windows you are using:
“C:\Users\[username]\AppData\Roaming\Apple Computer\iTunes\iPhone Software Updates\” (Windows 7)
“C:\Users\[username]\AppData\Roaming\Apple Computer\iTunes\iPhone Software Updates\” (Windows Vista)
“C:\Documents and Settings\[username]\Application Data\Apple Computer\iTunes\iPhone Software Update\” (Windows XP)
Note: Make sure you have enabled “Show Hidden Files and Folders” option in Tools->Folder Options.. –> View tab found in Windows Explorer to see the directory locations mentioned above.
Step 6: Restart iTunes. You will now be prompted to install the new firmware 3.1.2 from iTunes. DO NOT UPDATE from this prompt. Just close this dialog by clicking on “x” from the top right-most corner of the window.
Step 7: Now you will have to restore your iPhone to this custom firmware 3.1.2 that you have just downloaded for your iPhone. Click on your phone from the sidebar in iTunes to get to this screen as shown in the screenshot below:
iTunes 9.0.1 on Windows 7
Step 8: Press and hold left “Shift” button on the keyboard and then click on “Restore” (Not “Update” or “Check for Update”) button in the iTunes and then release the “Shift” button.
This will make iTunes prompt you to select the location for your downloaded custom firmware 3.1.2. Select that custom .ipsw file and click on “Open”.
iPhone2,1_3.1.2_7D11_Custom_Restore
Step 9: Now sit back and enjoy as iTunes does the rest for you. This will involve a series of automated steps. Be patient at this stage and don’t do anything silly. Just wait while iTunes installs the new firmware 3.1.2 on your iPhone. Your iPhone screen at this point will be showing a progress bar indicating installation progress. After the installation is done, iPhone will restart automatically and you should now have a fully jailbroken iPhone running on firmware 3.1.2.
How to: Unlock iPhone on 3.1.2 Firmware:
You can now follow the tutorial/guide posted here to unlock your iPhone 3GS or iPhone 3G on firmware 3.1.2 using ultrasn0w.
Step 10: Once you are done with the unlocking and jailbreak process. You can now restore all your settings, apps, music, contacts and photos to the newly installed firmware version 3.1.2 by restoring the backup that you made in Step 2 from iTunes.
UPDATE 1: Follow the step-by-step guide posted here to fix missing carrier name or logo on your unlocked and jailbroken iPhone 3G/3GS running firmware 3.1.2.
UPDATE 2: Follow the step-by-step guide posted here to Enable Tethering on iPhone 3.1.2 Firmware.
UPDATE 3: You may also like to check out How to: Patch MobileInstallation File on iPhone 3.1.2 Firmware.
UPDATE 4: Native MMS functionality in Messages app on iPhone 2G can now be enabled using the step by step guide posted here.
UPDATE 5: Fix Push Notifications on Hacktivated iPhone 2G/3G/3GS running iPhone firmware 3.1.2 can be found here.
You can follow me on twitter or join our facebook fanpage to keep yourself updated on all the latest jailbreaking and unlocking releases.
Feel free to ask me any question here should you run into any problem during the update process.
Disclaimer: This guide is for testing & educational purposes only. Follow it on your own risk. I’m not responsible for any loss of important data or malfunctioning of your iPhone.
Download iTunes 9.0.1 for Windows

Jailbreak iPhone 3.1.2 Firmware with blackra1n

George Hotz (aka geohot), the kid who was the first to unlock the original iPhone back in 2007 and then iPhone 3GS in July of this year is back! This time he is the first one to release jailbreaking solution for the new iPhone 3.1.2 Firmware for all devices through his new tool called blackra1n. blackra1n is a software tool which can jailbreak (not unlock) all iPhone’s (iPhone (Edge), iPhone 3G and iPhone 3GS) and iPod touch’s (iPod touch 2G and 3G) running on firmware version 3.1.2. blackra1n is currently for Windows only, a Mac version of this app can be expected soon.
UPDATE: An updated version of this guide for blackra1n RC3 with blacksn0w can be found here.
So, what is blackra1n? blackra1n is a 30 second ALL device 3.1.2 jailbreak. Even the ipt3, but the ipt3 is tethered. In order to boot it, just rerun blackra1n.
blackra1n - Jailbreak for iPhone 3.1.2 FirmwareImage via ModMyi
Follow the steps below to jailbreak all iPhone’s and iPod touches on OS 3.1.2:
Note for iPhone 3G and 3GS: Do NOT upgrade to iPhone 3.1.2 with blackra1n if you want to keep your unlock as doing so will result in upgrade of your baseband which will make it almost impossible for you to unlock.
Step 1: Download and install the latest version of iTunes (download link given below).
Step 2: You will now need to first update/restore to the original iPhone OS firmware 3.1.2 on your iPhone by using the latest version of iTunes. Download link for iPhone Firmware 3.1.2 is given at the end of the post.
iPhone OS Firmware 3.1.2
Step 3: Download blackra1n for Windows (download link at the end of the post).
Step 4: Start blackra1n app. If you are on Windows 7 or Vista, run the app with “Windows XP Compatibility” mode by enabling it from the “Properties” tab to avoid any errors during the jailbreak process.
Step 5: Click on “make it ra1n”:
blackra1n
Step 6: Let the app do its thing and wait for the phone to automatically reboot.
Step 7: You should now have “blackra1n” in the list of applications on your iPhone. Run “blackra1n”, download Cydia and let it install it.
blackra1n
blackra1nImage Credit: elmarseillais
Step 8: Finally reboot your iPhone. Voila! You should now have fully jailbroken iPhone or iPod touch running on firmware 3.1.2.
UPDATE 1: PwnageTool 3.1.4 has been released which can Jailbreak iPhone on 3.1.2 while keeping its baseband intact to 04.26.08. Complete step-by-step jailbreaking guide for Mac OS X can be found here and for Windows here. Unlocking guide for iPhone 3G and 3GS on 3.1.2 firmware can be found here.
UPDATE 2: blackra1n is now available for Mac OS X as well. Download link plus complete step-by-step instructions guide on how to jailbreak iPhone/iPod touch using blackra1n on Mac OS X can be found here.
UPDATE 3: Follow the step-by-step guide posted here to fix missing carrier name or logo on your unlocked and jailbroken iPhone 3G/3GS running firmware 3.1.2.
UPDATE 4: Follow the step-by-step guide posted here to Enable Tethering on iPhone 3.1.2 Firmware.
UPDATE 5: You may also like to check out How to: Patch MobileInstallation File on iPhone 3.1.2 Firmware.
UPDATE 6: Native MMS functionality in Messages app on iPhone 2G can now be enabled using the step by step guide posted here.
UPDATE 7: Fix Push Notifications on Hacktivated iPhone 2G/3G/3GS running iPhone firmware 3.1.2 can be found here.
UPDATE 8: blackra1n RC2 is Live. Click here for more details.
UPDATE 9: blackra1n RC3 with blacksn0w is now available. Follow the complete step-by-step guide here to jailbreak, and here to unlock iPhone 3.1.2 firmware with 05.11.07 baseband.
You can follow me on twitter or join our facebook fanpage to keep yourself updated on all the latest iPhone jailbreaking and unlocking releases.
Download iTunes
Download iPhone 3.1.2 Firmware
Download blackra1n for Windows (UPDATE: blackra1n RC3 Now Available)

Jailbreak Unlock iPhone 3G 3GS 3.1.2 with Blackra1n.saudi arab

The Blackra1n RC3 software is available for both Windows and Mac (Tiger+PPC) users, and it supports  iPhone 3G, iPhone 3GS with baseband unlock 05.11.07. Blackra1n RC3 is the most advanced and easy to use utility. Blackra1n RC3 includes the Blacksn0w “ unlock for the latest 05.11.07 baseband ” “ enable official tethering ” and a ” huge 15 second speed improvement ”. GeoHot credited iH8sn0w for the AT+XEMN command,  the command injection vector used to get code running on the baseband. We also apperitiate the stand of GeoHot to declining the $ 10K prize money from Jody Sander.
_____________________________________________________________________________________
Download of interest
_____________________________________________________________________________________
Get Prepare to Jailbreak your iPhone
Before attempting the tutorial consider all the following points and select right method for you :
  1. I have a locked iPhone 3G/3GS with firmware 3.X.X not jailbreaked before : Follow the Step One to Step Six.
  2. I have a locked iPhone 3G/3GS with Firmware 3.X.X and jailbreaked before : You have two conditions
  • If you still have the Blackra1n.app on your iPhone springboard simply run it. You will see Icy replaced by an option "ra1n". Install this to upgrade your app. After upgrading, run blackra1n.app again. You will see "sn0w". Install this, and enjoy your unlocked iPhone.
Ra1n
  • If you deleted the Blackra1n.app from your iPhone or you are on pwned iPhone then simply wait for the Blacksn0w release on Cydia. Blacksn0w will be added to Cydia sometime after the Blackra1n release, and instructions will be posted here. or follow the following condition and do a clean install of 3.1.2
3.    I am on firmware 3.X.X and i don’t mind a clean install of 3.1.2 : Then simply Download the Stock Firmware linked above and restore your iPhone to stock 3.1.2 With Shift + Restore (Windows) Option + Restore (Mac) in iTunes or simply hit the update button in iTunes and then follow the Step One to Step Six.
_____________________________________________________________________________________
Guide to Jailbreak your iPhone
Step One. Download Blackra1n RC3 and double click the rain drop icon to launch the program. Windows 7 Vista users if you have any difficulty in launching the program follow the highlighted instructions otherwise jump to Step Two. I didn’t faced any problem with Windows 7so just in case if Blacksn0w crashes during the launch follow the following three steps otherwise Jump to Step Two.
  • Right-click the blackra1n icon and click properties.
  • Click the Compatibility tab.
  • Under compatibility mode click the box to enable it and select Windows XP (Service Pack 2). Click OK, and then run blackra1n.
Step Two. Click the make it ra1n button.
Blacksn0w RC3

Step Three. You iPhone will now be placed in recovery mode. You will see a picture of GeoHot that replaces the regular recovery mode screen on your device.

Step Four. Your iPhone or iPod Touch will reboot once blackra1n is done doing it’s thing and you should see the blackra1n icon on there. If you don’t see the blackra1n icon, go to the last page on your iDevice and you should see it.
21558
Step Five. Install your preferred application from the blackra1n app. You have the option of choosing Cydia, Rock and Sn0w. I don’t recommend you to install them all at once, because that may cause problems. Install them one at a time then reboot and then second one.
Step Six. Sn0w is the unlock we all were waited from a long. Just hit the sn0w button and the magic will happen itself. After the process enjoy your unlocked baseband 5.11.07
_____________________________________________________________________________________
Post Jailbreak fixes
  1. Fix AFC2 Error : Blackra1n doesn’t adds the afc2 support to your jailbreaked iPhone. iPhone browser, iFunbox, Diskaid etc uses the afc2 service to access the file system and allow the transfer of files such as Winterboard  themes, NES ROMs or eBooks to the iPhone. In short you can’t access root partition of your drive with desktop clients.
  • Launch the cydia and search for afc2add and install this patch.
  • After installation reboot your phone and you’ll be fine again.
   2.   Fix no WiFi after the Blackra1n : To fix broken WiFi Reset network settings, then reboot and WiFi will work again.

Apple’s Official iPhone 3G Unlock

While most iPhone users are aware of unofficial unlock methods, you may be surprised to discover that it’s possible to legally unlock your device, courtesy of Apple.
official_iPhone_3G_unlock
The above image is the not-often-seen official unlock notification, as displayed in iTunes. The dialogue succinctly confirms that the user’s iPhone, in this case a 3G, has been unlocked and can now be used on any carrier. Note the Apple logo at the top left — this is a result of an official unlock sanctioned by Apple.
Read on to find out how I legally unlocked my iPhone 3G.

In June, while over 1 million early adopters in the U.S. picked up their brand new iPhone 3GS devices, I was anxiously waiting for the official launch in my current country of residence, Finland. I picked up my iPhone 3GS in Helsinki just two weeks ago, when it was finally launched by Sonera.
Regarding Sonera, think of it as a less-repugnant version of AT&T. As the exclusive distributor of the iPhone over in Finland, Sonera has turned out to be a somewhat benevolent carrier. The carrier’s unlimited data plan is reasonably priced, and home hacking your iPhone to tether to your Macbook is positively encouraged.
And now I’ve discovered that Sonera is also happy to lend a helping hand in unlocking your old iPhone 3G. When the 3G was released last year, Sonera customers had to sign up for a two-year contract. When upgrading to the iPhone 3GS, those same customers are given the option to pay off the remainder of their original 3G contract. Paying off the contract, and thus completing the two years prematurely, entitles the customer to have their iPhone 3G unlocked.
The helpful assistant at the Sonera store made a note of my IMEI number and then passed it onto his boss — after that there’s a special piece of software that only his boss is authorized to use. This mystical application submits the IMEI to Apple, which in turn authorizes the device for unlocking.
I was advised that when the iPhone 3G was next synced with iTunes, it would be unlocked. Minutes later, back at home, I connected the iPhone 3G to iTunes and received a new carrier settings update. After downloading and installing the update, Apple’s official iPhone unlock screen appeared.
Going the legit route was a much more painless process than using a proxy SIM or the Dev Team’s unofficial unlock. Also worth noting is that, unlike some of the illicit approaches, this unlock is permanent: I’ll be able to keep updating the iPhone’s OS without losing the ability to use any carrier SIM in the device.
It was a surprisingly quick, easy and free unlock for me, although I’d be very interested to find out if any of our readers around the world have had similar success in unlocking their iPhones.

We’re putting the iPhone 3G, BlackBerry Bold and HTC Dream (G1) to the test – tell us what you want to know

iPhone 3G vs BlackBerry Bold vs HTC DreamI’ve been testing like crazy, and hope to bring you the most complete round-up review of the three hottest smartphones on the market right now – the iPhone 3G, BlackBerry Bold and the HTC Dream (T-Mobile G1).
Before I start writing it up, is there anything you want to know about how these devices compare that you can’t find elsewhere? Let us know in the comments!

myvu Shades 301 iPod Edition

For makers of wearable video displays -- essentially, nose-mounted miniature video monitors with supporting frames, capable of letting you watch an iPod's video without squinting at a tiny Apple screen -- it has long been believed that mainstream popularity will come at a point when pricing and aesthetics become comparable to a good pair of sunglasses, rather than an expensive pair of goggles. Major strides have been made over the last several years, as companies such as Myvu and Vuzix developed lightweight dual-screen displays that looked like little more than an anonymizing black plastic bar in front of your eyes and ears, selling in the $200 to $300 range. While not attractive in the strictest sense of the word, the displays have become increasingly neutral, and by the end of last year rested on the fine edge of public tolerance.
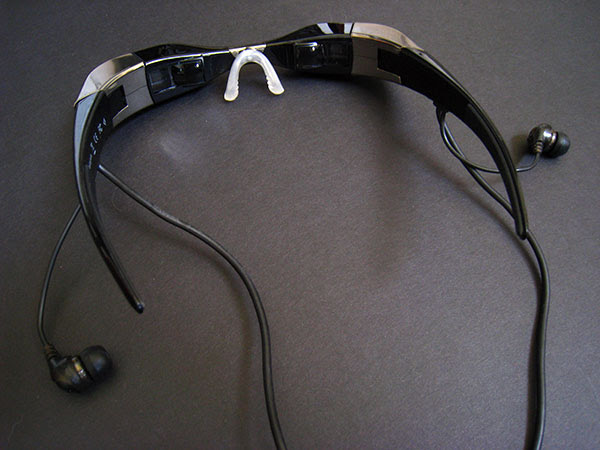
This year, for better or worse, manufacturers decided to design their way out of visual neutrality. While Germany’s Carl Zeiss turned to design house FROG Design for what regrettably became the uber-nerdy Cinemizer, Myvu partnered with Korea’s INNO Design to develop more stylish frames that might meet with greater popular interest, or at least spark discussion about what is and isn’t good display design. The results are two new products called Shades 301 ($200) and Crystal 701 ($300), which despite internal similarities have turned out to be substantially different products. Neither is a truly mainstream product, but Crystal comes closer to that mark. Both are designed to work with current-generation iPod nano, classic, and touch models.
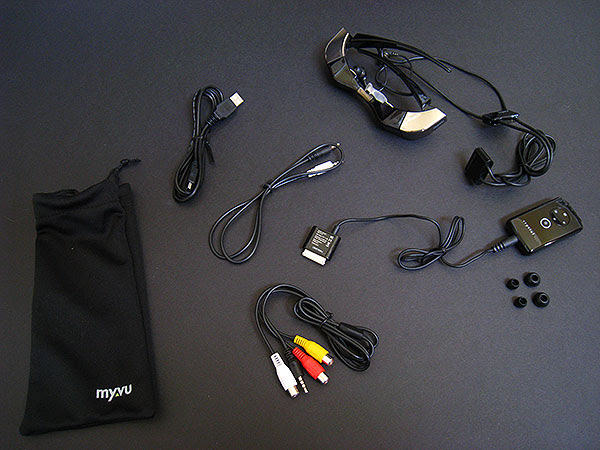
Shades and Crystal both include the same general components. Open each box and you’ll find one pair of sunglass-like goggles with permanently attached dangling earbuds, a remote control unit for toggling volume, brightness, and power, plus a Dock Connector cable to attach to your iPod. You also get a simple fabric carrying bag, a USB cable for recharging, and three sets of silicone tips for the integrated Ultimate Ears-branded earbuds. Myvu also sells a Standard Edition of each headset with video cables that work with non-iPod devices, and a Universal Myvu Connection Kit for $25 to adapt the iPod version for more devices.
Regardless of whether you use the iPod cable or something else, an issue common to Shades and Crystal is that there’s a lot more cable bulk here than in prior Myvu iPod goggles—a step backwards in convenience and tangle for the user. Myvu previously used a single cable to run from the goggles to the remote, with another cable running to the iPod. Now there are two cables connecting the headset to the remote, which Myvu attempts to manage with a magnetic cable manager that we wouldn’t want to store next to a hard disk-based iPod. The remote connects somewhat loosely to the headset with an unsecured, Dock Connector-esque blade of pins, too. Each of these parts struck us as tolerable, but not up to the generally improving design standards of the company’s earlier Personal Media Viewer Solo Plus Edition.
Shades and Crystal differ in three primary ways: frame design, display technology, and battery life. Both are designed to be usable while you’re doing other things—say, walking—and thereby give you the ability to see around the displays rather than trying to completely engross you with huge images. Shades’ frames position the monitors below eye level, with dark lenses at eye level, in a shell that oddly evokes the sunglasses favored by Kim Jong Il. Crystal’s frame design instead looks like earlier Myvu wearable displays, only significantly pinched in the middle and chromed on the sides. Both have a single rubber-coated nose piece that uses flexible metal inside to resize for different nose shapes.
While neither of these frame designs is spectacular, Crystal’s is better. Like virtually every other wearable display we’ve ever tested, Crystal worked properly from moment one, requiring only the slightest nose piece adjustment to rest evenly and be viewed as intended. By comparison, we literally went through three pairs of Shades 301 goggles in an effort to find one that worked properly, only to discover that they had been designed in a manner that will work for some viewers and not others: the screens inside are on an offset, “peer down on us” angle that this reviewer found impossible to use, seeing the top 1/3 to 1/2 of the screen, but not the rest. Another iLounge editor could wear the same goggles and see the screens properly, but it will be a toss-up from user to user depending on the shape and relative locations of your nose and eyes. This is the first time we’ve experienced this in a wearable display, and hopefully, it’ll be the last.
The other key differences between Shades and Crystal are in display technology and battery life. Shades uses twin 320x240 displays—the same as what’s in Solo Plus—but now benefits from 10 hours of battery life versus the original Myvu’s 6 and Solo Plus’s 4. Crystal uses superior 640x480 displays that draw more battery power, restricting this model’s performance to 4 hours of run time. If the frames and screens were otherwise equivalent, we might think that the tradeoff was in Shades’ favor, but again, there’s no question that Crystal is better.
When both units are viewed properly, Crystal video looks better than Shades video in numerous ways. Whereas Shades produces an image that looks like just an iPod classic being held perpetually underneath your nose, minus a little color balance, Crystal presents a larger-looking screen with more detail, rendering on-screen text more readable and other fine details more visible. If you’ve created, downloaded or converted videos at 640x480 resolution, the spec generally offered by the iTunes Store, you’ll be able to see more detail on Crystal’s screens than you can on an iPod’s. Crystal’s brightness and contrast settings enable its picture to look more vivid and colorful than Shades’ screen, as well; frames aside, the lower priced model is good, but not the rival of current iPods in display quality.
It is worth noting that Crystal is a generally significant advance over the aforementioned Zeiss Cinemizer, as well. Though Cinemizer also has 640x480 display technology, Myvu sells Crystal for less, offers considerably superior styling, the video doesn’t look washed out, and the earpieces are better. Both units contain four-hour batteries; the only way in which Cinemizer may be better for some users is its integrated diopter adjustment system, which in our view did not compensate for its washed-out colors, but did enhance sharpness. With Crystal, what you see the first time you look inside is pretty much what you get, and depending on your eye positions, you may notice some blurring or mirror imaging—unlike Shades, we found this model to be pretty good in these regards overall, with minor blurring on the edges of the screen. It’s our view that a more adjustable nose piece would have improved the experience for some viewers.
Sonically, both Crystal and Shades use Ultimate Ears-branded earbuds that are more than adequate for video viewing purposes. By comparison with other headsets we’ve tested, most of which screw up even simple audio with large, awkward earbuds that stick out on plastic pipes, these are very comfortable. With the right size of silicone eartips attached, they provide enough bass and isolation to let you hear the clomping of dinosaur feet and low parts of music, as well as screening out most of the world around you while watching your video. You can adjust volume both on the iPod and through the included remote control; tweaking the relative levels may be necessary to achieve optimal sound quality.
Overall, though Shades was a fairly major disappointment for us—a model that we wouldn’t prefer or recommend over its Solo Plus predecessor, despite battery and other enhancements—Crystal is the best 640x480 wearable display we’ve yet seen for the iPod. It suffers more from increased cable clutter and genre-wide price and design concerns than anything fatal in its actual performance, so although we would hope to see an even more refined version in the future, Crystal 701 and the earlier Solo Plus would be our top recommendations if you’re looking for a good wearable display right now.

Myvu Personal Media Viewer Solo Plus Edition

Last year, there was a small but real competition between several companies to produce the best wearable video display for iPods: MicroOptical, Icuiti, ezGear and others released add-on iPod screens shaped like sunglasses, and designed to be worn like them, typically in an airplane or other seat where another iPod-ready TV screen wasn't already available. The idea: provide a more comfortable and convenient viewing experience than the one offered by the fifth-generation iPod's 2.5", 320x240 display. And the best of these options was MicroOptical's myvu Made for iPod Edition, which won our Best of the Year award for 2006.
This year, MicroOptical has renamed itself Myvu—now with a capital “M”—and released two new versions of its eponymous product, one called the Universal Edition, and the other the Made for iPod Solo Plus Edition. Both sell for $200 and use a redesigned version of last year’s Myvu headset, with some noticeable improvements to the prior version, as well as some detractions from it. The Universal and Solo Plus Editions differ from each other only in pack-ins: Universal includes cables for camcorders, DVD players, and non-iPod portable players, while Solo Plus includes an iPod-specific video cable. Each unit’s pack-ins can be purchased for the other at a price of $25.
The basic shape, size, and look of the core Myvu wearable video display has not changed at all. Inside the included cloth bag, you’ll still find a pair of all-black glasses that look like a visually neutral version of Star Trek: The Next Generation’s Geordi LaForge’s visor, with a cable extending from the stem that touches your left ear. In-canal earbuds dangle from both sides and fit easily into your ears. The cable connects to an egg-shaped pendant with five buttons, versus the prior version’s six, and continues running down to a Dock Connector that plugs into your iPod. Solo Plus, unlike last year’s version, contains an Apple authentication chip so that it can work with the iPod classic, the third-generation iPod nano, iPod touch, and the iPhone. It also works properly with the fifth-generation iPod.
Changes have subtly been made to each component from last year’s version. Start with the cable, which now connects directly to your iPod in the case of Solo Plus, or uses a collection of interchangeable cables for different devices in the case of the Universal Edition. This is a big change from the original myvu device, which shipped with a fifth-generation iPod-sized battery pack-slash-case that was tolerable, but not exactly tiny. The benefit of the new design is that it hides a four-hour rechargeable battery inside—almost enough for a cross-continental U.S. flight—and doesn’t look bizarre when attached to an iPod nano or otherwise not-quite-5G-sized iPod or iPhone. On the flip side, you lose the prior version’s larger six-hour battery in the process.
There are other losses, too. Myvu no longer includes a travel case, belt or pendant clips, a car charger, or a wall charger in the package. You recharge the battery by plugging the included cable into your computer’s USB port and the pendant—the same cable synchronizes when plugged into the Dock Connector—and get only a carrying bag, replacement nose bridges, and eartips for different sized heads and ears. The earphones, while apparently by Ultimate Ears, don’t have the bass richness of their predecessors, though they look a little nicer. Volume is now controlled on the iPod itself, rather than on the in-line control pendant, which is now used solely for power, screen brightness and contrast adjustments, the latter more diverse than the prior model’s limited settings. Myvu’s new display technology is a hint off the mark of its predecessor—still the same general size, and just as watchable, but certain fine details aren’t as evident. There are still two separate LCD screens inside, one per eye, and though the video is still clean, it was easier to read on-screen text in the prior version.
For those unfamiliar, the concept behind these wearable displays is to project a video image in front of them that resembles a big screen TV at a certain distance away from your eyes. Some companies might say that their displays are equivalent to viewing an IMAX movie screen at a distance of 1 mile away, but this one is billed as the same as a 27” TV at a distance of 7 feet away. Another way to put this is that Myvu’s 320x240 display looks like an iPod classic’s screen 1 or 2 feet from your eyes, or an iPod nano’s screen a foot away. It’s not as beautiful or detailed as holding up an iPhone at a comparable distance, but it won’t tax your arms at all, and with the earphones in, you can comfortably lay back and see video in front of you no matter where your head is positioned. It’s worth reiterating at this point that Myvu’s approach to mounting the glasses, while not perfect, is a lot more comfortable and tolerable for extended viewing than the competing products we’ve tested. And as before, the goggles let a bit of the outside world through on the sides, and plenty on the top and bottom, so you’re not totally sealed off from whatever’s going on around you—looking at the video is a matter of choosing your focus, rather than being engrossed.
Making up for this package’s various losses in features is its lower price: when MicroOptical launched the original “myvu,” the price was supposed to be $399, and then it quickly moved to the more aggressive $299 level to spark sales. The company now is offering these versions for nearly $100 less, which in our view largely justifies the modestly diminished performance of the new versions; of the changes, the only one we’re especially concerned about at this price is the lower battery life, with the headphones in second.
If there’s any big picture negative to these two new Myvu products, it’s this: as the iPod/iPhone family is increasing in on-screen and TV-out resolution capabilities, with some models at a 480x320 native resolution, and 640x480 output now possible, these wearable displays are going in the opposite direction, shaving off performance to reach lower price points. In other words, put on the glasses and, depending on the iPod or iPhone, you might be diminishing rather than enhancing certain aspects of the viewing experience. That’s the major reason this year’s model rates a notch below last year’s, even at its lower price; as iPods continue to improve, so should their accessories. But if you can put that aside—especially if you’re not using the higher-resolution iPod touch or iPhone screens—you’ll find the Myvu Universal Edition or Solo Plus Edition to be fun, reasonably priced wearable video displays.

myvu Crystal 701 iPod Edition

For makers of wearable video displays—essentially, nose-mounted miniature video monitors with supporting frames, capable of letting you watch an iPod’s video without squinting at a tiny Apple screen—it has long been believed that mainstream popularity will come at a point when pricing and aesthetics become comparable to a good pair of sunglasses, rather than an expensive pair of goggles. Major strides have been made over the last several years, as companies such as Myvu and Vuzix developed lightweight dual-screen displays that looked like little more than an anonymizing black plastic bar in front of your eyes and ears, selling in the $200 to $300 range. While not attractive in the strictest sense of the word, the displays have become increasingly neutral, and by the end of last year rested on the fine edge of public tolerance.
This year, for better or worse, manufacturers decided to design their way out of visual neutrality. While Germany’s Carl Zeiss turned to design house FROG Design for what regrettably became the uber-nerdy Cinemizer, Myvu partnered with Korea’s INNO Design to develop more stylish frames that might meet with greater popular interest, or at least spark discussion about what is and isn’t good display design. The results are two new products called Shades 301 ($200) and Crystal 701 ($300), which despite internal similarities have turned out to be substantially different products. Neither is a truly mainstream product, but Crystal comes closer to that mark. Both are designed to work with current-generation iPod nano, classic, and touch models.
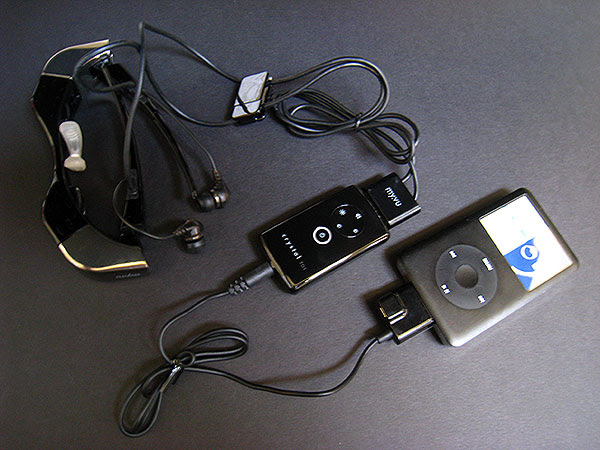
Shades and Crystal both include the same general components. Open each box and you’ll find one pair of sunglass-like goggles with permanently attached dangling earbuds, a remote control unit for toggling volume, brightness, and power, plus a Dock Connector cable to attach to your iPod. You also get a simple fabric carrying bag, a USB cable for recharging, and three sets of silicone tips for the integrated Ultimate Ears-branded earbuds. Myvu also sells a Standard Edition of each headset with video cables that work with non-iPod devices, and a Universal Myvu Connection Kit for $25 to adapt the iPod version for more devices. Crystal 701 is shown here with both the iPod and Standard Edition cables, though only one or the other would typically be included for the $300 asking price.
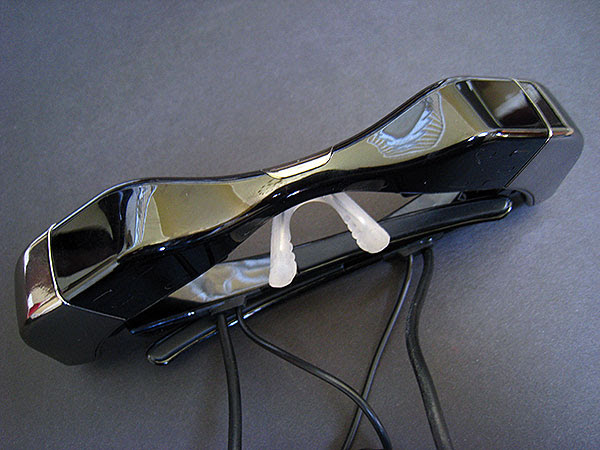
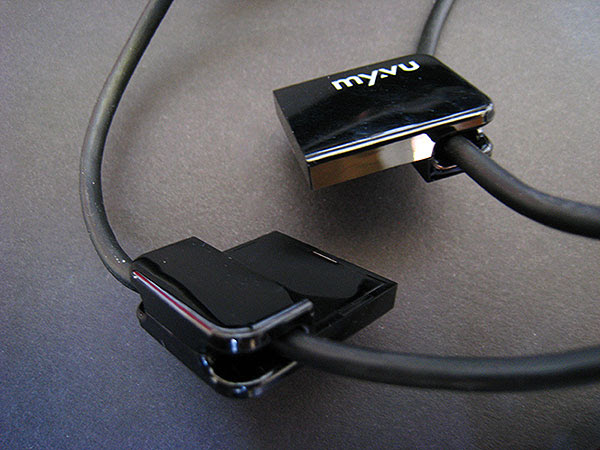
Regardless of whether you use the iPod cable or something else, an issue common to Shades and Crystal is that there’s a lot more cable bulk here than in prior Myvu iPod goggles—a step backwards in convenience and tangle for the user. Myvu previously used a single cable to run from the goggles to the remote, with another cable running to the iPod. Now there are two cables connecting the headset to the remote, which Myvu attempts to manage with a magnetic cable manager that we wouldn’t want to store next to a hard disk-based iPod. The remote connects somewhat loosely to the headset with an unsecured, Dock Connector-esque blade of pins, too. Each of these parts struck us as tolerable, but not up to the generally improving design standards of the company’s earlier Personal Media Viewer Solo Plus Edition.
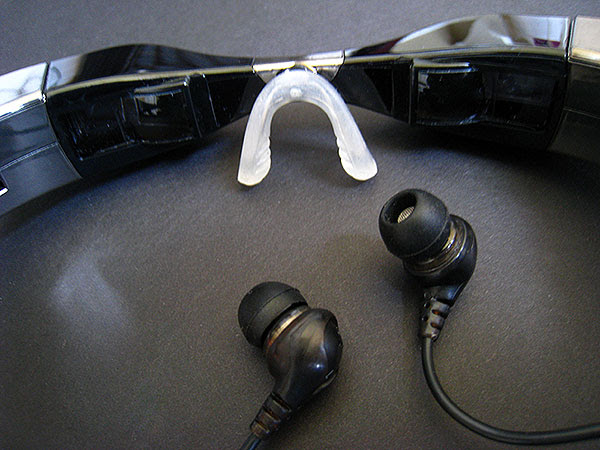
Shades and Crystal differ in three primary ways: frame design, display technology, and battery life. Both are designed to be usable while you’re doing other things—say, walking—and thereby give you the ability to see around the displays rather than trying to completely engross you with huge images. Shades’ frames position the monitors below eye level, with dark lenses at eye level, in a shell that oddly evokes the sunglasses favored by Kim Jong Il. Crystal’s frame design instead looks like earlier Myvu wearable displays, only significantly pinched in the middle and chromed on the sides. Both have a single rubber-coated nose piece that uses flexible metal inside to resize for different nose shapes.
While neither of these frame designs is spectacular, Crystal’s is better. Like virtually every other wearable display we’ve ever tested, Crystal worked properly from moment one, requiring only the slightest nose piece adjustment to rest evenly and be viewed as intended. By comparison, we literally went through three pairs of Shades 301 goggles in an effort to find one that worked properly, only to discover that they had been designed in a manner that will work for some viewers and not others: the screens inside are on an offset, “peer down on us” angle that this reviewer found impossible to use, seeing the top 1/3 to 1/2 of the screen, but not the rest. Another iLounge editor could wear the same goggles and see the screens properly, but it will be a toss-up from user to user depending on the shape and relative locations of your nose and eyes. This is the first time we’ve experienced this in a wearable display, and hopefully, it’ll be the last.
The other key differences between Shades and Crystal are in display technology and battery life. Shades uses twin 320x240 displays—the same as what’s in Solo Plus—but now benefits from 10 hours of battery life versus the original Myvu’s 6 and Solo Plus’s 4. Crystal uses superior 640x480 displays that draw more battery power, restricting this model’s performance to 4 hours of run time. If the frames and screens were otherwise equivalent, we might think that the tradeoff was in Shades’ favor, but again, there’s no question that Crystal is better.
When both units are viewed properly, Crystal video looks better than Shades video in numerous ways. Whereas Shades produces an image that looks like just an iPod classic being held perpetually underneath your nose, minus a little color balance, Crystal presents a larger-looking screen with more detail, rendering on-screen text more readable and other fine details more visible. If you’ve created, downloaded or converted videos at 640x480 resolution, the spec generally offered by the iTunes Store, you’ll be able to see more detail on Crystal’s screens than you can on an iPod’s. Crystal’s brightness and contrast settings enable its picture to look more vivid and colorful than Shades’ screen, as well; frames aside, the lower priced model is good, but not the rival of current iPods in display quality.
It is worth noting that Crystal is a generally significant advance over the aforementioned Zeiss Cinemizer, as well. Though Cinemizer also has 640x480 display technology, Myvu sells Crystal for less, offers considerably superior styling, the video doesn’t look washed out, and the earpieces are better. Both units contain four-hour batteries; the only way in which Cinemizer may be better for some users is its integrated diopter adjustment system, which in our view did not compensate for its washed-out colors, but did enhance sharpness. With Crystal, what you see the first time you look inside is pretty much what you get, and depending on your eye positions, you may notice some blurring or mirror imaging—unlike Shades, we found this model to be pretty good in these regards overall, with minor blurring on the edges of the screen. It’s our view that a more adjustable nose piece would have improved the experience for some viewers.
Sonically, both Crystal and Shades use Ultimate Ears-branded earbuds that are more than adequate for video viewing purposes. By comparison with other headsets we’ve tested, most of which screw up even simple audio with large, awkward earbuds that stick out on plastic pipes, these are very comfortable. With the right size of silicone eartips attached, they provide enough bass and isolation to let you hear the clomping of dinosaur feet and low parts of music, as well as screening out most of the world around you while watching your video. You can adjust volume both on the iPod and through the included remote control; tweaking the relative levels may be necessary to achieve optimal sound quality.
Overall, though Shades was a fairly major disappointment for us—a model that we wouldn’t prefer or recommend over its Solo Plus predecessor, despite battery and other enhancements—Crystal is the best 640x480 wearable display we’ve yet seen for the iPod. It suffers more from increased cable clutter and genre-wide price and design concerns than anything fatal in its actual performance, so although we would hope to see an even more refined version in the future, Crystal 701 and the earlier Solo Plus would be our top recommendations if you’re looking for a good wearable display right now.
Myvu Corp. myvu Universal Edition

Last year, there was a small but real competition between several companies to produce the best wearable video display for iPods: MicroOptical, Icuiti, ezGear and others released add-on iPod screens shaped like sunglasses, and designed to be worn like them, typically in an airplane or other seat where another iPod-ready TV screen wasn't already available. The idea: provide a more comfortable and convenient viewing experience than the one offered by the fifth-generation iPod's 2.5", 320x240 display. And the best of these options was MicroOptical's myvu Made for iPod Edition, which won our Best of the Year award for 2006.
This year, MicroOptical has renamed itself Myvu—now with a capital “M”—and released two new versions of its eponymous product, one called the Universal Edition, and the other the Made for iPod Solo Plus Edition. Both sell for $200 and use a redesigned version of last year’s Myvu headset, with some noticeable improvements to the prior version, as well as some detractions from it. The Universal and Solo Plus Editions differ from each other only in pack-ins: Universal includes cables for camcorders, DVD players, and non-iPod portable players, while Solo Plus includes an iPod-specific video cable. Each unit’s pack-ins can be purchased for the other at a price of $25.
The basic shape, size, and look of the core Myvu wearable video display has not changed at all. Inside the included cloth bag, you’ll still find a pair of all-black glasses that look like a visually neutral version of Star Trek: The Next Generation’s Geordi LaForge’s visor, with a cable extending from the stem that touches your left ear. In-canal earbuds dangle from both sides and fit easily into your ears. The cable connects to an egg-shaped pendant with five buttons, versus the prior version’s six, and continues running down to a Dock Connector that plugs into your iPod. Solo Plus, unlike last year’s version, contains an Apple authentication chip so that it can work with the iPod classic, the third-generation iPod nano, iPod touch, and the iPhone. It also works properly with the fifth-generation iPod.
Changes have subtly been made to each component from last year’s version. Start with the cable, which now connects directly to your iPod in the case of Solo Plus, or uses a collection of interchangeable cables for different devices in the case of the Universal Edition. This is a big change from the original myvu device, which shipped with a fifth-generation iPod-sized battery pack-slash-case that was tolerable, but not exactly tiny. The benefit of the new design is that it hides a four-hour rechargeable battery inside—almost enough for a cross-continental U.S. flight—and doesn’t look bizarre when attached to an iPod nano or otherwise not-quite-5G-sized iPod or iPhone. On the flip side, you lose the prior version’s larger six-hour battery in the process.
There are other losses, too. Myvu no longer includes a travel case, belt or pendant clips, a car charger, or a wall charger in the package. You recharge the battery by plugging the included cable into your computer’s USB port and the pendant—the same cable synchronizes when plugged into the Dock Connector—and get only a carrying bag, replacement nose bridges, and eartips for different sized heads and ears. The earphones, while apparently by Ultimate Ears, don’t have the bass richness of their predecessors, though they look a little nicer. Volume is now controlled on the iPod itself, rather than on the in-line control pendant, which is now used solely for power, screen brightness and contrast adjustments, the latter more diverse than the prior model’s limited settings. Myvu’s new display technology is a hint off the mark of its predecessor—still the same general size, and just as watchable, but certain fine details aren’t as evident. There are still two separate LCD screens inside, one per eye, and though the video is still clean, it was easier to read on-screen text in the prior version.
For those unfamiliar, the concept behind these wearable displays is to project a video image in front of them that resembles a big screen TV at a certain distance away from your eyes. Some companies might say that their displays are equivalent to viewing an IMAX movie screen at a distance of 1 mile away, but this one is billed as the same as a 27” TV at a distance of 7 feet away. Another way to put this is that Myvu’s 320x240 display looks like an iPod classic’s screen 1 or 2 feet from your eyes, or an iPod nano’s screen a foot away. It’s not as beautiful or detailed as holding up an iPhone at a comparable distance, but it won’t tax your arms at all, and with the earphones in, you can comfortably lay back and see video in front of you no matter where your head is positioned. It’s worth reiterating at this point that Myvu’s approach to mounting the glasses, while not perfect, is a lot more comfortable and tolerable for extended viewing than the competing products we’ve tested. And as before, the goggles let a bit of the outside world through on the sides, and plenty on the top and bottom, so you’re not totally sealed off from whatever’s going on around you—looking at the video is a matter of choosing your focus, rather than being engrossed.
Making up for this package’s various losses in features is its lower price: when MicroOptical launched the original “myvu,” the price was supposed to be $399, and then it quickly moved to the more aggressive $299 level to spark sales. The company now is offering these versions for nearly $100 less, which in our view largely justifies the modestly diminished performance of the new versions; of the changes, the only one we’re especially concerned about at this price is the lower battery life, with the headphones in second.
If there’s any big picture negative to these two new Myvu products, it’s this: as the iPod/iPhone family is increasing in on-screen and TV-out resolution capabilities, with some models at a 480x320 native resolution, and 640x480 output now possible, these wearable displays are going in the opposite direction, shaving off performance to reach lower price points. In other words, put on the glasses and, depending on the iPod or iPhone, you might be diminishing rather than enhancing certain aspects of the viewing experience. That’s the major reason this year’s model rates a notch below last year’s, even at its lower price; as iPods continue to improve, so should their accessories. But if you can put that aside—especially if you’re not using the higher-resolution iPod touch or iPhone screens—you’ll find the Myvu Universal Edition or Solo Plus Edition to be fun, reasonably priced wearable video displays.

MicroOptical myvu Made for iPod Edition

Every iPod accessory category has a best-of-breed entry, and MicroOptical’s myvu for iPod is the best wearable video display we’ve tested. Designed to let you watch iPod videos while you lay back in any chair, myvu consists of a pair of lightweight goggles with two 320x240 LCD screens in front of your eyes, earbuds dangling down for your ears, and a cable with an in-line remote control leading to your iPod. Shipping with detachable rubber nosepieces and silicone rubber ear tips of various sizes, myvu provides the best overall comfort we’ve yet experienced in a wearable display, fitting your nose noticeably better than current alternatives, and ears substantially so, sealing your canals against outside noise. Similarly, the dual screens provide a viewing experience that’s similar to seeing a clear, medium-sized TV floating in front of your eyes - better-looking than both iWear and ezVision, and completely contrast- and brightness-adjustable, though smaller.
In our Buyers’ Guide review of myvu, we noted that the company’s $399 asking price wasn’t as attractive as it needed to be to win over more mainstream buyers, but said that MicroOptical’s kit, which includes a nice 6-hour iPod battery pack/case to extend your play time, and a quality ballistic nylon, zippered travel pouch, feels like a complete and well-designed package. Immediately after our review, and based on our comments, MicroOptical took an impressive step, dropping the package’s price by $100 - a factor that makes this package an even better value than it was before. While we’re not re-rating it based on the new price, we feel even more strongly that it’s worth readers’ attention: when we’ve handed our unit off to various people for outside opinions, some have gone so far as to say that they’d sooner take myvu on a plane than the portable video displays we’ve reviewed (Memorex iFlip, Sonic Impact Video-55, and iLuv i1055), based on myvu’s comfort and convenience. Some people will write all of these displays off until they reach even lower price and higher performance or fashion points, but for the iPod, myvu is a very good start.
It’s also worth noting a few other factors, taken from our First Look at myvu. MicroOptical also includes both wall and car chargers, a belt clip, and a soft carrying bag that doubles as a lens cloth. You can charge the system via a standard USB cable and synchronize your docked iPod with a PC or Mac at the same time.
The combination case and battery pack indicates remaining power via four lights and a button on its back side; your goggles are connected to the case’s top, and then a Dock Connector connection is made with the iPod inside.
MicroOptical’s dual-display technology promises 320x240 resolution - identical to the iPod’s screen - with 24-bit color. The visual effect is claimed to be equivalent to a 27-inch television at a distance of roughly 7 feet away, but the company isn’t aiming for immersiveness: as explained to us back in January, the goal is to allow you to see the world around you while the display is in use. There are three related issues we feel are worth noting in greater detail here: we found the display small - a bit too small, but still watchable, and moreso than on either of the other iPod wearable headsets out there - one user with a larger intra-ocular distance found the display impossible to adjust for optimal viewing. And several testers commented correctly that the unit’s designed-in ability to let you see the world around you while you’re viewing video can be distracting under certain circumstances, one noting that this is the right pair of goggles to wear in a plane, but not as a passenger in a car. Icuiti’s iWear does a better job of screening the world out, if that’s what you’re trying to accomplish, and myvu should really include a way to temporarily block out your surroundings.
We also really liked the pendant remote control, which offers a convenient combination of iPod and headset controls across six buttons rather than forcing you to look at your iPod to make changes while wearing the goggles. A clip on the back enables the remote to be attached to your shirt while the display is in use. Hopefully, Apple will design a nice on-TV interface for the iPod, enabling these devices to let you browse your video library fully from a remote without the need to ever pop the goggles off - we’re keeping our fingers crossed.